usb7
small usb devices
User's guide
Step 1: introduction
- USB 3.0 Sniffer connects to Internet via Ethernet WAN port.
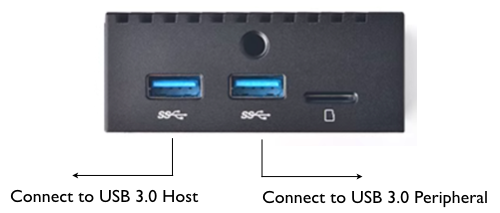
- There are 2 USB connectors. One is at the middle which is used to connect to USB 3.0 peripheral. The other is at the side which is used to connect to USB 3.0 Host (e.g. macOS, Windows or Linux computer). Picture is as below:

- There are 2 modes:
- Configure mode. Without USB peripheral connected and power on USB 3.0 Sniffer.
- Capture mode. With USB peripheral connected.
- LED:
- In configure mode, SYS LED lights, this is used to connect to USB 3.0 Sniffer and register it with your www.usb7.net account
Step 2: connect Ethernet WAN port and register
- 2.1 Please login www.usb7.net with your Google account before proceed. If you do not have Google account, please create one.
- 2.2 Make sure there is no USB peripheral connected to USB 3.0 Sniffer, connect it to macOS, Windows or Linux computer.
- 2.3 Connect Ethernet WAN port to your router.
- 2.4 After 25 seconds and USB 3.0 Sniffer finishes booting, SYS LED lights, in computer browser input its IP address 172.16.10.1 to access it.
- 2.5 Click "Go to register" button at the top right to register USB 3.0 Sniffer with your www.usb7.net account.
Step 3: connect USB 3.0 peripheral to USB 3.0 Sniffer
- Connect USB 3.0 peripheral to USB 3.0 Sniffer.
Step 4 through step 8:
- These steps are identical to tinySniffer. Link is here: