tinySniffer user's guide
Step 1: introduction
- There are 2 USB interfaces in tinySniffer, one is to connect USB peripheral, the other is to connect tinySniffer to USB Host (e.g. macOS, Windows or Linux computer).
- There is 2.4GHz WiFi.
- There are 2 LEDs, and they are red and green respectively.
- When there is no USB peripheral connected to tinySniffer and tinySniffer is connected to macOS, Windows or Linux computer, red LED lights. This is mainly to configure WiFi in tinySniffer and register tinySniffer with www.usb7.net account.
- When WiFi is connected, green LED blinks.
Step 2: configure WiFi and register tinySniffer
- Make sure there is no USB peripheral connected to tinySniffer, connect tinySniffer to macOS, Windows or Linux computer.
- After 25 seconds and tinySniffer finishes booting and red LED lights, in computer browser and input tinySniffer IP address 172.16.10.1 to access tinySniffer.
- Follow instructions in the browser and connect tinySniffer to WiFi. After 10 seconds, can see tinySniffer WiFi IP address and green LED blinks (this indicates WiFi is connected).
- Click Register button to register tinySniffer with www.usb7.net account.
Step 3: connect USB peripheral to tinySniffer
- Connect USB peripheral (e.g. keyboard or audio device) to tinySniffer
- Note: please do NOT connect a USB peripheral with huge traffic like USB Flash Drive.
Step 4: login to www.usb7.net and access tinySniffer
- Login to www.usb7.net, go to My Devices and access tinySniffer
- Input login / password = sniff / tinySniffer
- Please use command passwd to change password
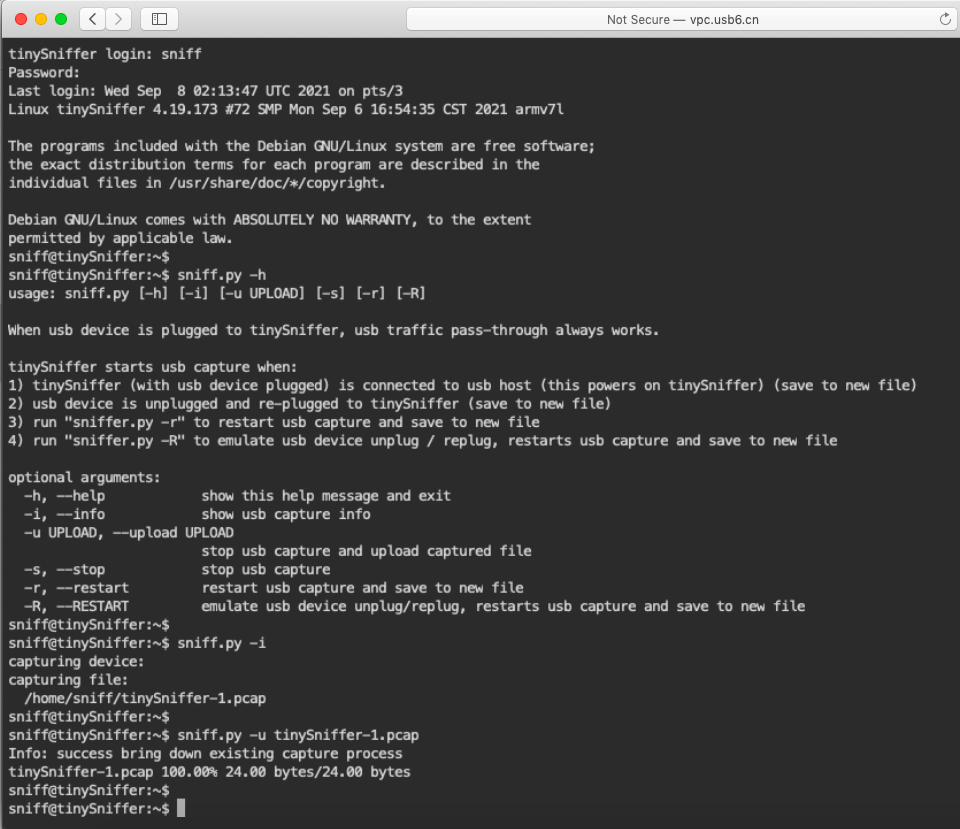
- sniff.py instructions
sniff@tinySniffer:~$ sniff.py -h
usage: sniff.py [-h] [-i] [-u UPLOAD] [-s] [-r] [-R]

When usb device is plugged to tinySniffer, usb traffic pass-through always works.

tinySniffer starts usb capture when:
1) tinySniffer (with usb device plugged) is connected to usb host (this powers on tinySniffer) (save to new file)
2) usb device is unplugged and re-plugged to tinySniffer (save to new file)
3) run "sniffer.py -r" to restart usb capture and save to new file
4) run "sniffer.py -R" to emulate usb device unplug / replug, restarts usb capture and save to new file

optional arguments:
  -h, --help            show this help message and exit
  -i, --info            show usb capture info
  -u UPLOAD, --upload UPLOAD
                        stop usb capture and upload captured file
  -s, --stop            stop usb capture
  -r, --restart         restart usb capture and save to new file
  -R, --RESTART         emulate usb device unplug/replug, restarts usb capture and save to new file
- Check sniff.py information
sniff@tinySniffer:~$ sniff.py -i
capturing device:
capturing file:
  /home/sniff/tinySniffer-1.pcap
- Upload the captured USB packets
- Please follow instructions in browser to save the uploaded file to a different folder
sniff@tinySniffer:~$ sniff.py -u tinySniffer-1.pcap
Info: success bring down existing capture process
tinySniffer-1.pcap 100.00% 24.00 bytes/24.00 bytes
Step 5: use Wireshark to view captured USB packets

Step 6: use Wireshark display filter
usb.urb_type == URB_COMPLETE
Step 7: use capture filter
- Use capture filter to filter out the specified USB packets to reduce the size of the captured packets.
- Run command "sniff -h" to see detailed information about using capture filter.